3DP Chip inventories your PC’s hardware and helps you back up and install the proper drivers
Sometimes when we re-install Windows one or more hardware drivers will simply fail to be installed. Who know’s why this happens, but when it does we’re often left with the task of tracking the driver(s) down and installing them manually.
Depending on the device in question, finding a suitable driver can be difficult, if not impossible, especially if you can’t even identify the device in question.
A handy free tool called 3DP Chip can help you identify and track down the correct drivers for every hardware component in your computer. No more guesswork! It can also back up your computer’s current drivers and restore them at a later date and time.
After you install 3DP Chip it will inventory your computer’s hardware devices and list their exact names. That makes it a lot easier to find a suitable driver for any devices that don’t have one installed.
The nice thing about 3DP Chip is how it helps you install missing drivers even if one the missing drivers is for the network card. If the network driver is missing, 3DP Chip will find one that works from its stand-alone pool of drivers. That will allow you to get onto the Internet and track down the rest of the missing drivers.
As I mentioned above, 3DP Chip is a free download. Follow these instructions to download and install it:
1 – Click here to visit the 3DP Chip download page.
2 – Click the green Download Now button that’s located in the “Ratings” and “Quick Specs” box. The 3DP Chip installation file will automatically be downloaded onto your hard drive. DO NOT click any other “Download” buttons on the page. Those buttons are really ads for other products.
3 – Double-click the 3DP Chip installation file to start the installation procedure. Note: If you can’t find the downloaded file, you can press the Ctrl+J key combination to display a list of your downloaded files. Just select the 3DP Chip installation file from the list.
4 – The first window you’re likely to see is a “Security Warning”. If so, click the Run button.
5 – Click the OK button to select English as the language. If you prefer a different language, select it from the drop-down box, then click OK.
6 – Click Next.
7 – Click I Agree to accept the license agreement.
8 – Click Next to select the 3DP Chip utility for installation. I recommend that you DO NOT check the other box.
9 – Click Next to accept the default installation folder. You will now be asked to select either an “Express” or “Custom” installation. I strongly recommend that you select Custom. That will allow you to avoid installing extra software and changing your default search engine.
10 – Select Custom Installation, then uncheck both of the check boxes.
11 – Click Next.
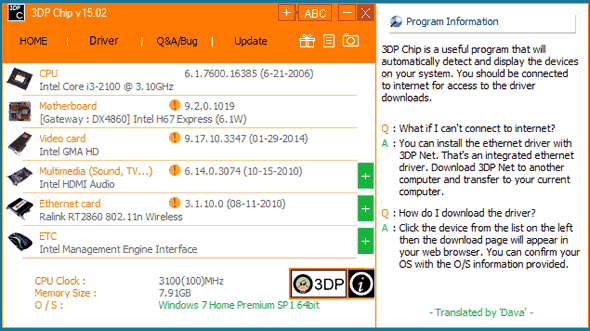
12 – Click Install. The 3DP Chip utility will be installed, then it will immediately scan your system’s hardware and list the devices by name. You should now see something like this screenshot that I took from my own PC:
You can click the “Plus Sign” (+) at the top of the window to display a detailed listing of all the info that was gathered by the hardware scan.
I recommend that you use 3DP Chip to create a backup of your PC’s current driver set. That way you can use it to restore your drivers if one of them ever gets corrupted or you have to re-install Windows. To create a backup of your PC’s driver set, click the Driver tab, then select Backup.
Note: You should copy the driver backup files to an external hard drive, a thumb drive or to the cloud. If your hard drive fails or you have to re-install Windows, the backup files will be lost if you simply leave them on the hard drive.
That’s all there is to it. Now you’ll be able to use 3DP Chip to restore your computer’s hardware drivers or install them from scratch if you ever need to.


No comments:
Post a Comment